Setting up environment #
Setting up the environment for Arduino LVGL Examples #
- Adding supported libraries
Compiling and Uploading the LVGL Widgets #
- Pre-requisites.
- Compile and Upload.
Compiling and Uploading the LVGL music #
- Pre-requisites.
- Compile and Upload.
Setting up environment #
For detailed instructions on installing the Arduino IDE and adding the board, please refer to the Getting Started with NORVI ESP32 HMI document. Getting Started with NORVI ESP32 HMI provides step-by-step guidance on the setup process and Arduino Graphics Library Examples.
Setting up the environment for Arduino LVGL Examples #
- Adding supported libraries
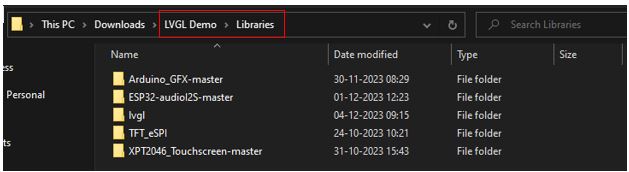
Download the LVGL Demo folder for the test program, essential libraries, and files from the link below.
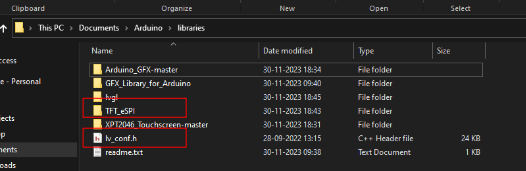
Copy the libraries from the downloaded LVGL Demo folder into the Arduino library folder.
Or Open the library manager in Arduino IDE Install all the following libraries and do the provided Changes to the library.
- Arduino_GFX-master –
- XPT2046_Touchscreen-master
- ESP32-audioI2S-master
- TFT_eSPI
- lvgl
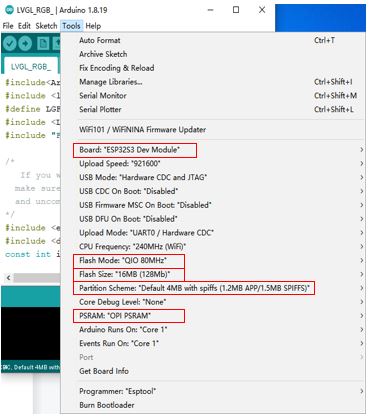
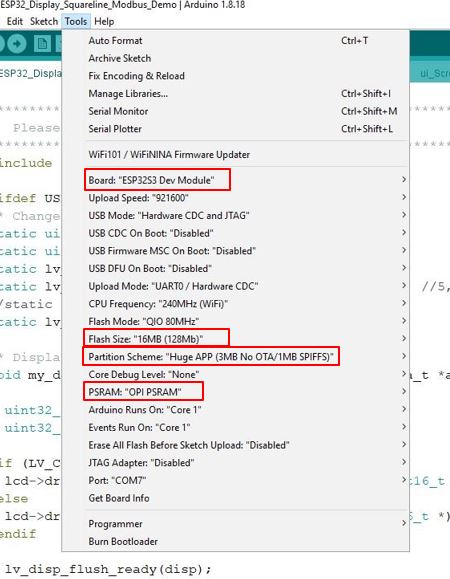
Choose the chip and settings according to the chip as shown below,
Compiling and Uploading the LVGL Widgets #
- Pre-requisites.
Copy the lv_conf.h of the LVGL Demo/3_3-4_TFT-LVGL-Widgets/LVGLconfiguration replacement file and replace it under the Arduino library file, it must be in the same root directory as the library TFT_eSPI. If there is an existing lv_conf.h file please replace it.
lv_conf.h – The lv_conf.h file is used to configure various settings and options for the LVGL library. This file is specific to the example program.

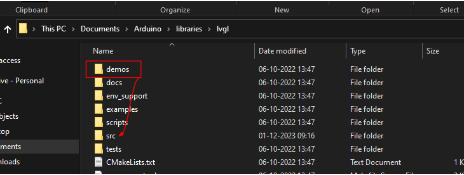
Copy the demos folder in the libraries/lvgl to the src folder in the libraries/lvgl/src.
2. Compile and Upload
Open the LvglWidgets program in LVGL Demo/3_3-4_TFT-LVGL-Widgets/LvglWidgets file.
Check the pin configuration of the program.
Arduino_ESP32RGBPanel *bus = new Arduino_ESP32RGBPanel(
GFX_NOT_DEFINED /* CS */, GFX_NOT_DEFINED /* SCK */, GFX_NOT_DEFINED /* SDA */,
4 /* DE */, 5 /* VSYNC */, 6 /* HSYNC */, 7 /* PCLK */,
1 /* R0 */, 41 /* R1 */, 40 /* R2 */, 38 /* R3 */, 45 /* R4 */,
47 /* G0 */, 21 /* G1 */, 14 /* G2 */, 9 /* G3 */, 3 /* G4 */, 3 /* G5 */,
8 /* B0 */, 18 /* B1 */, 17 /* B2 */, 16 /* B3 */, 15 /* B4 */
);
Arduino_RPi_DPI_RGBPanel *gfx = new Arduino_RPi_DPI_RGBPanel(
bus,
800 /* width */, 0 /* hsync_polarity */, 210 /* hsync_front_porch */, 30 /* hsync_pulse_width */, 16 /* hsync_back_porch */,
480 /* height */, 0 /* vsync_polarity */, 22 /* vsync_front_porch */, 13 /* vsync_pulse_width */, 10 /* vsync_back_porch */,
1 /* pclk_active_neg */, 16000000 /* prefer_speed */, true /* auto_flush */);
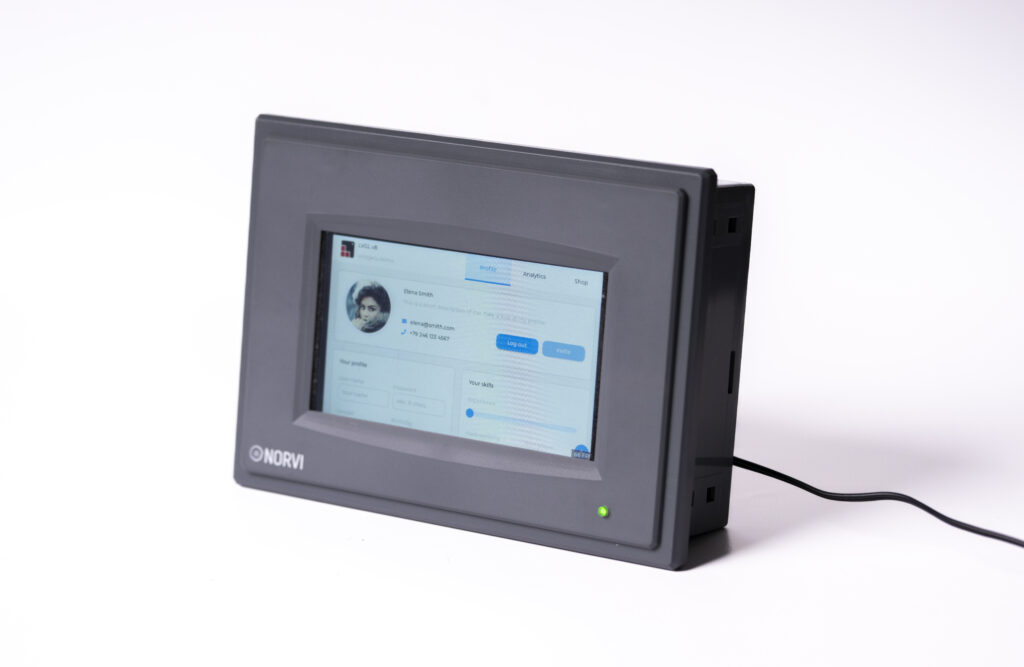
#endif /* !defined(DISPLAY_DEV_KIT) */After compiling and uploading the program, the User interface of the NORVI HMI should be as below.

Compiling and Uploading the LVGL music. #
- Pre-requisites.
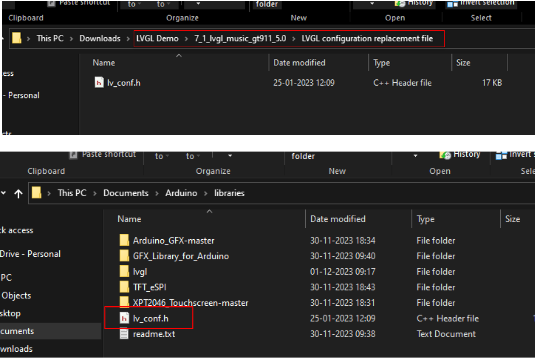
Copy the lv_conf.h of the LVGL Demo/7_1_lvgl_music_gt911_5.0/LVGLconfiguration replacement file and replace it under the Arduino library file, it must be in the same root directory as the library TFT_eSPI. If there is an existing lv_conf.h file please replace it.
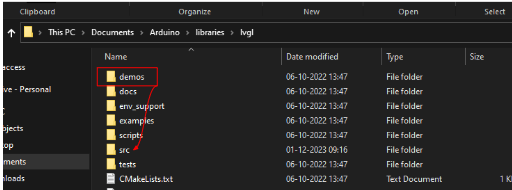
Copy the demos folder in the LVGL Demo/libraries/lvgl to the src folder in the LVGL Demo/libraries/lvgl/src.
Insert the SD card with the mp3 files, into the NORVI HMI.
Choose the chip and settings according to the chip as shown below,
Note that partition scheme for the Lvgl music example should be Huge APP (3MB No OTA/1MB SPIFFS)
2. Compile and Upload
Open the lvgl_music_gt911_5.0 program in LVGL Demo/3_3-4_TFT-LVGL-Widgets/lvgl_music_gt911_5.0 file.
Check the pin configuration of the program.
Arduino_ESP32RGBPanel *bus = new Arduino_ESP32RGBPanel(
GFX_NOT_DEFINED /* CS */, GFX_NOT_DEFINED /* SCK */, GFX_NOT_DEFINED /* SDA */,
4 /* DE */, 5 /* VSYNC */, 6 /* HSYNC */, 7 /* PCLK */,
1 /* R0 */, 41 /* R1 */, 40 /* R2 */, 38 /* R3 */, 45 /* R4 */,
47 /* G0 */, 21 /* G1 */, 14 /* G2 */, 9 /* G3 */, 3 /* G4 */, 3 /* G5 */,
8 /* B0 */, 18 /* B1 */, 17 /* B2 */, 16 /* B3 */, 15 /* B4 */
);
Arduino_RPi_DPI_RGBPanel *gfx = new Arduino_RPi_DPI_RGBPanel(
bus,
800 /* width */, 0 /* hsync_polarity */, 210 /* hsync_front_porch */, 30 /* hsync_pulse_width */, 16 /* hsync_back_porch */,
480 /* height */, 0 /* vsync_polarity */, 22 /* vsync_front_porch */, 13 /* vsync_pulse_width */, 10 /* vsync_back_porch */,
1 /* pclk_active_neg */, 16000000 /* prefer_speed */, true /* auto_flush */);
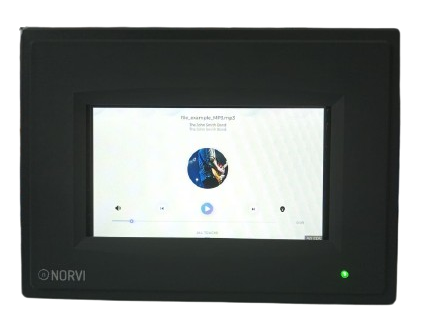
#endif /* !defined(DISPLAY_DEV_KIT) */After compiling and uploading the program, the User interface of the NORVI HMI should be as below.