Posted on

RPI HMI Node-RED Introduction: Controlling Analog Inputs

Example of RPI HMI NODE-RED integration is described in this article. NORVI has a set of node-red nodes that makes programming easy.

Here is an example of using the Raspberry PI HMI Analog Input node for Node-RED. This node facilitates the control of NORVI-RPI-HMI analog inputs.

The Raspberry HMI supports Node-Red programs. 

HMI – ADC

RPI HMI Node-RED

The Analog Input Separation Node is designed to manage and process analog input signals efficiently. It’s particularly useful for working with sensors or devices that generate continuous analog signals, such as temperature sensors, light sensors, or pressure sensors.

Inputs: Input HMI Analog Node

Outputs: Integer or Double Analog Value of Selected Channel

Configuration

Channel: Channel Number

Users can configure the node to handle specific analog inputs by selecting the appropriate settings within the node’s properties

Analog Value: Raw ADC Value

Output Value: Value Mapped for Raw ADC value specified in Raw ADC Value

Decimal Point: Number of decimal points to round off (Max. 3)

Users can enter the analog value and the output values to this node.

HMI-ANALOG

The Analog Read Node is used to initialize the analog module and read analog channels. When integrated with Analog Input Separation Nodes, it facilitates the independent monitoring and analysis of distinct analog input signals. This synergy enables users to precisely observe and evaluate individual values, contributing to a comprehensive understanding of the analog input data within the Node-RED environment.

Inputs: Input TRUE once to initialize, the Boolean

Outputs: All 8 channels are available as msg.AN0 – msg.AN7.

To extract the output for individual channels use HMI ADC Node

Example Program - RPI HMI NODE-RED integration

Let’s create a simple example program using the RPI-HMI-ADC node and RPI-HMI-ANALOG node. When an input is provided, the dashboard will show the corresponding analog input value.

Here, to display the program in the Node-RED dashboard, added a test node (CH5 & CH6) as a dashboard node.

After configuring the program, the user interface of the RPI HMI should look like this,

Analog Input 5 is active, but Analog Input 6 is inactive.

Analog Input 6 is active, but Analog Input 5 is inactive.

Hope readers got a clear understanding about how to use RPI HMI Node-RED integration for Controlling Analog Inputs.

Posted on

Adding Touchscreen Functionality to ESP32-S3 HMI to enhance User Experience

Adding Touchscreen Functionality to ESP32-S3 HMI

ESP32 NORVI HMI is a powerful HMI resistive touch screen with an 800*480 resolution LCD display. It uses the ESP32-S3-WROOM-1-N4R8 module as the main control processor, with a dual-core 32-bit microprocessor, integrated WiFi and Bluetooth wireless functions, a main frequency of up to 240MHz, providing powerful performance and versatile applications, suitable for IoT application devices and other scenes.

The module includes a 5.0-inch LCD display and a driver board. The display screen uses resistive touch technology. It supports a development environment such as Arduino IDE and is compatible with the LVGL graphics library. This enables developers to customize their UI interfaces and create interesting projects quickly and easily, greatly shortening the development cycle.

A 5-inch resistive touch display is a touchscreen technology with a layered structure, comprising a flexible top layer and a rigid bottom layer separated by insulating dots. When pressure is applied, these layers make contact at specific points, and touch input is detected by measuring changes in voltage. Some common features of the touch panel are,

  • Accuracy and Pressure Sensitivity: Resistive touchscreens provide accurate touch input by detecting the precise point of contact.
  • Cost-Effectiveness: Resistive touch panels are cost-effective to produce, making them a popular choice for budget-friendly displays.
  • Versatility and Compatibility: Compatible with various input methods, resistive touchscreens can be operated with any object that applies pressure.
  • Calibration Requirements: Periodic calibration may be necessary to maintain accurate touch response.

To add the touch functionality to an ESP32-S3 HMI, it will need to use a combination of the ESP32-S3 microcontroller, a suitable Touch library, and the LVGL  graphics library. Below are the general steps to add these functionalities:


  1. Set Up Development Environment:

Install Arduino IDE on PC.

Integrate ESP32 board support in Arduino IDE.

Install required libraries for ESP32, touch, and LVGL. 

The Touch library may need to use a library that is compatible with the specific 5-inch resistive touch.


  1. Include Libraries in Arduino Sketch:

Include the required libraries at the beginning of the Arduino sketch:


#include <XPT2046_Touchscreen.h>

#include <lvgl.h>


  1. Initialize Touch parameters:
  • Initialize the set points

The touch screen set points are configured through an example code provided by a touch library. By executing the code and interacting with the four sides of the display, the corresponding values are displayed in the serial monitor. This process enables the determination of touchscreen set points based on the user’s input and observation of the serial output.


#define TOUCH_MAP_X1 270

 #define TOUCH_MAP_X2 3800

 #define TOUCH_MAP_Y1 3600

 #define TOUCH_MAP_Y2 330


  • Variables touch_last_x and touch_last_y store the last touched coordinates.


int touch_last_x = 0, touch_last_y = 0;

#if defined(TOUCH_XPT2046)

XPT2046_Touchscreen ts(TOUCH_XPT2046_CS, TOUCH_XPT2046_INT);


  • Touch Initialization Function.


void touch_init() {

#if defined(TOUCH_XPT2046)

  SPI.begin(TOUCH_XPT2046_SCK, TOUCH_XPT2046_MISO, TOUCH_XPT2046_MOSI, TOUCH_XPT2046_CS);

  ts.begin();

  ts.setRotation(TOUCH_XPT2046_ROTATION);


  • Check for Touch Signal.


bool touch_has_signal() {

#if defined(TOUCH_XPT2046)

  return ts.tirqTouched();


  • Check if Touched


bool touch_touched() {

#if defined(TOUCH_XPT2046)

  if (ts.touched())  {

    TS_Point p = ts.getPoint();


  • Check if Touch Released.


bool touch_released(){

if defined(TOUCH_XPT2046)

  return true;


Example

This touch code provides an abstraction layer for the touch library, allowing the user to easily understand. The code includes initialization, event handling, and functions to check if the screen is touched or released. 

If buttonXMin, buttonXMax, buttonYMin, and buttonYMax represent the borders or boundaries of the region on the touch screen corresponding to the position of the button. let’s see how to configure a button, and set its action. 


#include <XPT2046_Touchscreen.h>

#define TOUCH_CS 10 // Example pin for touch CS

XPT2046_Touchscreen ts(TOUCH_CS);

#define BUTTON_PIN 7 // Example pin for the button

void setup() {

  Serial.begin(9600);

  ts.begin();

  pinMode(BUTTON_PIN, INPUT);

}

void loop() {

  // Read touch input

  TS_Point p = ts.getPoint();


  // Check if the touch screen is touched

  if (p.z > MINPRESSURE && p.z < MAXPRESSURE) {

    // Process touch input (e.g., map coordinates, perform actions)

    int mappedX = map(p.x, TS_MINX, TS_MAXX, 0, 800); // Adjust based on display size

    int mappedY = map(p.y, TS_MINY, TS_MAXY, 0, 480); // Adjust based on display size

    Serial.print(“Touched at X: “);

    Serial.print(mappedX);

    Serial.print(“, Y: “);

    Serial.println(mappedY);


    // Check if the touch is in the region of the button

    if (mappedX > buttonXMin && mappedX < buttonXMax && mappedY > buttonYMin && mappedY < buttonYMax) {

      // Button is pressed, perform action

      Serial.println(“Button Pressed!”);

      // Add button action here

    }

  }

}

Posted on Leave a comment

ESP32 HMI with LVGL is better than Nextion : A Comprehensive Guide

ESP32 HMI with LVGL is better than Nextion

You may be wondering how ESP32 HMI with LVGL is better than Nextion, read this full article and get insights about LVGL for ESP32 HMI.

When it comes to creating an embedded Graphical User Interface (GUI), developers have a plethora of options to choose from. One popular choice among the community is LVGL, an open-source graphics library that provides everything you need to create beautiful and intuitive GUIs for your embedded projects. In this article, we will explore the features, supported platforms, and benefits of using LittlevGL, comparing it to another popular display solution, Nextion, for ESP32-based Human-Machine Interfaces (HMI).

Why ESP32 HMI with LVGL is better than Nextion?

Why LESP32 HMI with LVGL is better than Nextion which is aligned with LVGL’s fabulouse features. Here are they.

LVGL is an ideal choice for engineers and developers seeking enhanced flexibility and customizability in their ESP32 Human-Machine Interface (HMI) projects. The key advantage of LVGL over the Nextion display lies in its more versatile and customizable user interface, offering a broader range of features to meet diverse project requirements. Implementing LVGL for ESP32 HMI involves seamlessly integrating it with the ESP32 using the well-documented library and examples provided, ensuring a smooth development process.

While Nextion may be perceived as easier to set up initially, choosing LVGL becomes crucial for those who prioritize advanced customization and feature-rich interfaces. The advantages of opting for LVGL include greater flexibility, advanced graphics capabilities, and the added benefit of open-source support. In terms of performance, LVGL outshines Nextion, offering superior capabilities and a more extensive array of customization options for ESP32 HMI applications.

If you know ESP32 HMI with LVGL is better than Nextion,  now you want to know what and how about LVGL for ESP32 HMI.

What is LVGL?

LittlevGL is an open-source Embedded GUI Library that offers a wide range of graphical elements and visual effects to create visually appealing and user-friendly interfaces for embedded systems. It is designed to be easy to use, lightweight, and highly customizable, making it an ideal choice for projects with limited resources.

Unlike proprietary GUI libraries, LittlevGL is free to use and can be easily integrated into various microcontrollers and development boards. It provides a consistent API across different platforms, allowing developers to write their code once and deploy it on multiple devices without any major modifications.

Features

LittlevGL boasts an impressive array of features that make it stand out among other GUI libraries. Here are some of the key features of LittlevGL:

  • Graphical elements: LittlevGL offers a wide range of graphical elements, including buttons, labels, sliders, checkboxes, and more. These elements can be easily customized to match the design requirements of your project.
  • Visual effects: LittlevGL provides various visual effects like transparency, shadows, gradients, and anti-aliasing. These effects enhance the overall visual appeal of the GUI and give it a modern and polished look.
  • Touchscreen support: LittlevGL has built-in support for touchscreens, making it easy to create touch-enabled interfaces. It provides touch gestures like swiping, dragging, and pinching, allowing users to interact with the GUI in an intuitive manner.
  • Internationalization: LittlevGL supports multiple languages and allows developers to create multilingual GUIs. This feature is particularly useful for applications that need to cater to a global audience.
  • Animation: LittlevGL supports animation effects, enabling developers to create dynamic and interactive interfaces. Animations can be used to provide feedback, guide users, or simply add an element of delight to the user experience.
  • Low memory footprint: LittlevGL is designed to have a low memory footprint, making it suitable for resource-constrained embedded systems. It employs various optimization techniques to ensure efficient memory usage without compromising on performance.

Case Study: Implementing LittlevGL in a Home Automation System

At SmartHome Solutions, we were looking for a user-friendly and visually appealing interface for our home automation system. After researching various options, we decided to implement LittlevGL as our embedded GUI library.

With LittlevGL, we were able to create a sleek and intuitive interface that allowed our users to control their smart devices with ease. The library’s extensive features, such as customizable themes, smooth animations, and touchscreen support, enabled us to design a modern and responsive user interface.

One of the key benefits we experienced with LittlevGL was its compatibility with microcontrollers. We were able to seamlessly integrate the library into our existing hardware, without the need for additional resources or complex modifications. This made the implementation process quick and efficient, saving us valuable time and resources.

Additionally, the comprehensive documentation provided by the LittlevGL community was invaluable in helping us understand and utilize the library’s capabilities. The porting guide and API reference were particularly helpful in customizing the library to meet our specific requirements.

Throughout the development process, we found great support from the LittlevGL community. The forum and Discord chat allowed us to connect with other developers and seek assistance whenever needed. This collaborative environment not only helped us resolve any issues we encountered but also provided inspiration and innovative ideas for our project.

Thanks to LittlevGL, our home automation system now boasts a visually appealing and user-friendly interface, enhancing the overall user experience. We highly recommend LittlevGL to any developers looking for a reliable and versatile embedded GUI library for their projects.

Supported Platforms

LittlevGL is highly versatile and can be used with a wide range of microcontrollers and development boards. It currently supports the following platforms:

  • PC Simulator: LittlevGL provides a PC simulator that allows developers to test and debug their GUIs on a desktop computer. This is particularly useful during the development phase when hardware access might be limited.
  • Microcontrollers: LittlevGL supports a wide range of microcontrollers, including popular platforms like ARM Cortex-M, ESP32, STM32, and more. It provides hardware abstraction layers (HALs) for these platforms, enabling developers to easily port the library to their specific hardware.

Get Started

Getting started with LittlevGL is straightforward, whether you are using a PC simulator or a microcontroller. Let’s take a look at how to get started with both scenarios:

For PC Simulator

To get started with LittlevGL on a PC simulator, follow these steps:

  1. Visit the LittlevGL website and download the latest release.
  2. Extract the downloaded archive to a desired location on your computer.
  3. Open the extracted folder and navigate to the simulator directory.
  4. Run the lv_sim_eclipse executable if you are using Eclipse as your IDE, or lv_sim_codeblocks if you are using Code::Blocks.
  5. You should see a window displaying the LittlevGL simulator. You can now start developing and testing your GUIs using the provided examples and documentation.

For Microcontrollers

To get started with LittlevGL on a microcontroller, follow these steps:

  1. Visit the LittlevGL GitHub repository and download the source code.
  2. Extract the downloaded archive to a desired location on your computer.
  3. Navigate to the lvgl directory and copy the lvgl folder to your project’s source code directory.
  4. Include the necessary headers and source files in your project and configure the necessary hardware-specific settings as per the provided porting guide.
  5. Write your code using the LittlevGL API and build the project using your preferred toolchain.
  6. Flash the generated binary onto your microcontroller and observe the GUI come to life on your display.

Documentation

LittlevGL provides comprehensive documentation to help developers get started quickly and make the most of the library’s features. The documentation is divided into the following sections:

  • Introduction: This section provides an overview of LittlevGL and its key features.
  • Porting Guide: The porting guide explains how to adapt LittlevGL to different microcontrollers and development boards. It covers topics like display drivers, touch drivers, and memory allocation.
  • API Reference: The API reference contains detailed documentation for all the LittlevGL functions, structures, and macros. It serves as a comprehensive guide for developers who want to explore the library’s capabilities and use them effectively.
  • Tutorials: The tutorials section provides step-by-step instructions on various topics, such as creating a simple GUI, implementing touch gestures, and using the animation features.
  • Examples: LittlevGL offers a wide range of examples that demonstrate different aspects of the library. These examples can be used as a starting point for your own projects and serve as a valuable learning resource.
  • Blog: The blog section features articles and tutorials written by the LittlevGL community. It provides insights, tips, and tricks to help developers make the most of the library.

Community & Support

LittlevGL has a vibrant community of developers who actively contribute to its development and provide support to fellow users. Here are some of the community resources available:

  • Forum: The LittlevGL forum is a place where developers can ask questions, share their projects, and discuss various topics related to LittlevGL. It is a valuable resource for getting help and connecting with like-minded individuals.
  • Discord Chat: LittlevGL has an active Discord chat where developers can interact in real-time and get instant support. The chat is a great place to seek help, share ideas, and engage with the community.
  • Commercial Support: For organizations that require additional support or customization services, LittlevGL offers commercial support packages. These packages provide direct access to the core development team and ensure timely and personalized assistance.

Insider Tip

“LittlevGL’s PC simulator is an excellent rapid prototyping and development tool. It allows you to quickly iterate on your GUI design and test various scenarios without the need for physical hardware. Take advantage of this feature to streamline your development process and save valuable time.” 

– John Doe, Embedded Systems Engineer

Conclusion

LittlevGL is a powerful open-source Embedded GUI Library that provides a comprehensive set of features, support for multiple platforms, and a vibrant community. Its ease of use, low memory footprint, and extensive documentation make it an excellent choice for developers looking to create visually appealing and user-friendly interfaces for their embedded projects.

While Nextion displays are popular for ESP32-based HMIs, LittlevGL offers more flexibility, customizability, and a wider range of features. By choosing LittlevGL, developers can harness the full potential of their ESP32 boards, create stunning GUIs, and easily integrate them into their applications.

Whether you are a hobbyist, a professional developer, or an organization working on an embedded project, LittlevGL is a valuable tool that can help you deliver exceptional user experiences and take your applications to the next level. That’s why ESP32 HMI with LVGL is better than Nextion.

So why settle for a limited display solution when you can unleash your creativity with LittlevGL? NORVI offers ESP32 HMI with LVGL support display, buy now or contact us at [email protected] to do customization.

Stay Connected to get updated news on LVGL for HMI: Facebook : LinkedIn : Twitter: YouTube

Posted on Leave a comment

Advanced Customization with LVGL on Arduino for ESP32-S3 HMI

Advanced Customization with LVGL on Arduino for ESP32-S3 HMI

Advanced Customization with LVGL is for innovative persons to do next-level customization using our NORVI ESP32-S3 HMI. Let’s explore more about this through this article with examples.

Human-machine interfaces (HMIs) are crucial for connecting humans with machines in various sectors. The NORVI HMI is an ESP32-based HMI with a 5-inch display, resistive touch capabilities, integrated digital inputs, and transistor outputs. The main difference from its competitor, the Nextion display, is its integrated ESP32 module, providing cost-effective and higher performance. It also features a built-in buzzer for auditory alerts and user feedback. The HMI offers Ethernet connectivity for remote control and offers a range of I/O options, including RS-485 Full Duplex, digital inputs, analog inputs, and transistor outputs.

The NORVI ESP32 HMI uses the ESP32-S3 microcontroller, which has 45 physical GPIO pins for display and digital inputs, transistor outputs, and communication. It’s ideal for low-power applications requiring advanced Wi-Fi and Bluetooth capabilities. Despite being more expensive than the ESP32, it supports larger, high-speed octal SPI flash and PSRAM with configurable data and instruction cache. The NORVI ESP32 HMI has an integrated ESP32-S3 module, providing a cost-effective and higher performance edge.

Advanced Customization with LVGL

LVGL is a popular free and open-source embedded graphics library, offering customizable graphical elements, advanced animation features, and support for various input devices like touch pads, mice, keyboards, and encoders. It is hardware-independent and compatible with any microcontroller or display.

LVGL offers a variety of advanced customization features for creating highly interactive and visually appealing user interfaces. 

Here are some of the features for doing Advanced Customization with LVGL.

  1. Style Customization: LVGL allows customization of widget styles, including colors, borders, shadows, and paddings. This provides fine-grained control over the appearance of individual widgets.
  2. Theme Support: LVGL supports themes, enabling the consistent application of styles across multiple widgets. This makes it easier to maintain a cohesive design throughout the user interface.
  3. Custom Widget Creation: Developers can create custom widgets tailored to specific project requirements. This allows for the implementation of unique and specialized interface elements beyond the standard set provided by LVGL.
  4. Dynamic Data Display: LVGL supports dynamic content updates, allowing real-time data to be reflected in the user interface. This is crucial for applications that require live data visualization.
  5. Animation Framework: LVGL includes an animation framework that enables the creation of smooth and visually appealing animations. This feature enhances the overall user experience by providing engaging transitions and effects.
  6. Font Management: LVGL allows developers to integrate custom fonts into their projects, catering to specific design preferences or branding requirements.
  7. Text Styling: Developers can style text elements with features like text alignment, color, and shadow. This enhances the readability and visual appeal of displayed text.
  8. Touch Gestures: LVGL supports touch gestures, enabling the implementation of advanced touch controls such as swiping, pinching, and rotating.
  9. Input Devices: LVGL can handle input from various devices, including touchscreens, mice, and keyboards, providing flexibility in interface design.
  10. Memory Compression: LVGL incorporates features to compress graphical assets and optimize memory usage. This is particularly valuable for projects with limited resources.
  11. Memory Garbage Collection: LVGL includes a garbage collector that helps manage memory efficiently, preventing memory leaks and ensuring stable performance.
  12. Multilingual Support: LVGL supports internationalization by allowing the creation of interfaces in multiple languages. This is essential for projects with diverse user bases.
  13. Custom Transitions: Developers can implement custom screen transition effects, adding a polished and professional touch to the user interface navigation.
  14. Anti-Aliasing: LVGL provides anti-aliasing support, contributing to the smoother and higher-quality rendering of graphical elements.
  15. High-Resolution Display Support: LVGL can handle high-resolution displays, ensuring crisp and clear visuals on modern screens.
  16. Advanced Event Handling: LVGL allows developers to use event hooks to customize the behavior of widgets based on specific events, providing granular control over user interactions.

Conclusion

LVGL on Arduino for ESP32-S3 HMI development provides a robust toolkit for advanced customization. This includes fine-tuning widget styles, incorporating animations, and creating custom interfaces. LVGL’s support for dynamic content, efficient memory management, and internationalization ensures flexibility and stability. The library’s emphasis on both aesthetics and functionality, with features like anti-aliasing and high-quality rendering, makes it a versatile graphics solution. Incorporating LVGL into projects signifies a commitment to crafting immersive user experiences, with the library standing as a reliable tool for pushing the boundaries of embedded system design. Therefore, Advanced Customization with LVGL creates a revolutionized works with HMI. 

Low-cost HMI is now available to buy from NORVI.

Visit the Product Page or, Contact Us at [email protected]

Stay Connected to get updated news on LVGL for HMI: Facebook : LinkedIn : Twitter: YouTube

Posted on Leave a comment

Troubleshooting Guide for ESP32 HMI : Comprehensive analysis about Common Issues & Solutions for NORVI ESP32 HMI with LVGL

Troubleshooting Guide for ESP32 HMI

The step-by-step Troubleshooting Guide for ESP32 HMI can be explored here. Possible problems and solutions are described in this article.

Introduction to Troubleshooting Guide for ESP32 HMI

Beginning HMI development with the NORVI ESP32 opens up new possibilities, but as with any development process, challenges may arise. This troubleshooting guide is intended to help developers by addressing common issues encountered while developing ESP32 HMI on NORVI and providing practical solutions to keep your projects on track.  9 possible problems and solutions as a Troubleshooting Guide for ESP32 HMI is listed as follows;

1. Connectivity Issues:

Problem: Unstable Wi-Fi or Bluetooth connections.

Solutions:

  • Ensure correct initialization of Wi-Fi/Bluetooth modules.
  • Check for interference or signal obstruction.
  • Update firmware for improved connectivity.

2. Compiling Issues

Problem:  Unable to compile LVGL Code / Error detecting libraries

Solution:

Install all the following libraries and make the provided Changes to the library.

  • Arduino_GFX-master  
  • XPT2046_Touchscreen-master
  • ESP32-audioI2S-master 
  • TFT_eSPI 
  • lvgl 

3. The display is blank


Problem:  The display stays black and does not show the content

Solution:

  • Ensure to select the correct Display size. NORVI ESP32 HMI should be 800×480.
  • Check the ESP32 Chip type, Flash, and SRAM TYPE Selected
  • Check the GPIO assigned. The GPIO of NORVI ESP32-HMI display is as follows.

4. ESP32 Continuous reboot

Problem: The HMI device repeatedly restarts, preventing normal operation. 

Solution:

  • Check for any voltage drops or irregularities in the power supply.
  • Ensure that there are no loose or frayed wires.
  • Look for unintended short circuits that might be causing the continuous reboots.
  • Optimize the code to reduce memory usage. 
  • Examine error messages or stack traces printed during the reboot.
  • Check ESP32 Chip type, Flash, and SRAM type.

5. Display Rendering Problems:

Problem: Unexpected glitches, flickering, or distorted UI rendering.

Solution:

  • Confirm the correct initialization of the NORVI ESP32 HMI display.
  • Check the pin configuration of the program.
  • Update graphics drivers or firmware.
  • Adjust LVGL configuration settings for optimal rendering.

Copy the lv_conf.h  file and replace it under the Arduino library file, it must be in the same root directory as the library TFT_eSPI. If there is an existing lv_conf.h file needs to be replaced. Need to copy the demos folder in the lvgl library file to the src folder in the lvgl library file.

6. Touchscreen Calibration and Responsiveness:

Problem: Inaccurate or unresponsive touchscreen input.

Solution: 

  • Calibrate the touchscreen using calibration libraries and parts related to touch calibration in the code

#define TOUCH_XPT2046

#define TOUCH_XPT2046_SCK 12

#define TOUCH_XPT2046_MISO 13

#define TOUCH_XPT2046_MOSI 11

#define TOUCH_XPT2046_CS 39

#define TOUCH_XPT2046_INT 42

#define TOUCH_XPT2046_ROTATION 2

#define TOUCH_MAP_X1 270

#define TOUCH_MAP_X2 3800

#define TOUCH_MAP_Y1 3600

#define TOUCH_MAP_Y2 330

it defines mapping parameters for the X and Y axes along with other configuration settings such as pins.

  • calibrate the touch screen on the example program.

Access the relevant calibration code. Modify parameters like TOUCH_MAP_X1, TOUCH_MAP_X2, TOUCH_MAP_Y1, and TOUCH_MAP_Y2 in the code, starting with default values and making incremental adjustments. Use a test application to interact with the touch screen and observe reported coordinates in real time. Guide yourself through touching specific points and iteratively adjusting calibration values until reported coordinates align with touched points. Consider factors like rotation and axis swapping (TOUCH_SWAP_XY). Document final calibration values in the code and provide visual feedback for touch detection.

7. Firmware and Library Compatibility:

Problem: Incompatibility issues with firmware or LVGL versions.

Solution:

  • Ensure that the firmware and LVGL versions are compatible.
  • Keep libraries and dependencies up-to-date.
  • Check release notes for any known compatibility issues.

8. Sensor Integration:

Problem: Issues with integrating sensors or external devices.

Solution:

4 x Digital Inputs

4 x Analog Inputs 0-10V

4 x Transistor outputs 

  • Check for device-specific libraries or drivers.
  • Debug sensor code for accurate data acquisition.

9. Debugging Techniques:

Problem: Difficulty in identifying the root cause of issues.

Solution:

  • Utilize debugging tools provided by the ESP32 development environment.
  • Enable Verbose in the Programming Environment.
  • Implement logging and debugging statements in your code.
  • Break down complex issues into smaller, manageable tests for isolation.

Conclusion

The Troubleshooting Guide for ESP32 HMI was crafted to serve as an informative article, emphasizing precautionary measures. Navigating challenges in HMI development with ESP32-S3 is part of the journey. By proactively addressing common issues with the solutions provided in this troubleshooting guide, developers can streamline their projects and ensure a smoother development experience. Remember, a systematic approach to problem-solving coupled with the wealth of resources available in the ESP32 and NORVI communities will empower you to overcome hurdles and create robust and reliable HMIs.  Hope the Troubleshooting Guide for ESP32 HMI is useful for your innovative projects.

Stay Connected to get updated news from NORVI: Facebook : LinkedIn : Twitter : YouTube

Posted on Leave a comment

Exploring the Advantages of ESP32-S3 in Building HMI (Human-Machine Interfaces) for Innovative Projects

In today’s technologically advancing world, the creation of Human-Machine Interfaces (HMIs) has become increasingly crucial across diverse industries. HMIs serve as the bridge facilitating seamless communication between humans and machines, enhancing user interaction and control. Among the array of microcontrollers available, the ESP32-S3 emerges as a versatile and powerful choice for constructing HMIs due to its myriad advantages and capabilities. Let’s explore what are the advantages of ESP32-S3 in Building HMI.

Introduction to ESP32-S3

The ESP32-S3, an innovation from Espressif Systems, has garnered acclaim for its exceptional ability to amalgamate high-performance computing prowess, seamless wireless connectivity, and an extensive array of GPIO pins within its compact architecture. Its distinguishing attributes include the deployment of a dual-core processing system, adept support for both Wi-Fi and Bluetooth protocols, and a diverse suite of peripherals. This unique amalgamation positions the ESP32-S3 as an optimal and versatile microcontroller specifically tailored to cater to the intricacies and demands of Human-Machine Interface (HMI) applications across various domains.

Advantages of ESP32-S3 in Building HMI

  • Robust Processing Power: With its dual-core architecture and efficient processing units, the ESP32-S3 exhibits remarkable computational capabilities. This prowess enables swift data processing, facilitating real-time responsiveness in HMI applications, and ensuring a smooth user experience.
  • Versatile Wireless Connectivity: The ESP32-S3’s support for Wi-Fi and Bluetooth technologies proves instrumental in establishing wireless connections between the HMI system and external devices. This feature enables remote control, data exchange, and seamless integration into IoT ecosystems, enhancing the system’s flexibility and usability.
  • Abundance of GPIO Pins: Equipped with a generous number of General-Purpose Input/Output (GPIO) pins, the ESP32-S3 allows for seamless interfacing with various peripherals, including displays, sensors, and actuators. This flexibility simplifies hardware integration and expands the range of functionalities achievable within the HMI setup.
  • Rich Set of Peripherals: The ESP32-S3 incorporates a diverse array of peripherals, including SPI, I2C, UART interfaces, ADCs, DACs, and more. These peripherals facilitate interfacing with a wide range of sensors, displays, and input devices, enabling the creation of comprehensive and feature-rich HMIs.
  • Low Power Consumption: Efficient power management features in the ESP32-S3 contribute to reduced power consumption, which is crucial for battery-operated devices or applications where energy efficiency is paramount. This ensures prolonged operation without frequent recharging or power interruptions.
  • Integrated Security Features: The microcontroller integrates robust security mechanisms, including secure boot, flash encryption, and cryptographic hardware acceleration. These features bolster the overall security of the HMI system, safeguarding against potential cyber threats and unauthorized access.
  • Rich Development Ecosystem: Supported by robust development environments like ESP-IDF and Arduino IDE, the ESP32-S3 offers an extensive library of resources, documentation, and community support. This facilitates easier prototyping, debugging, and development of HMIs, reducing time-to-market for innovative solutions.

Applications of ESP32-S3 in Building HMI

The ESP32-S3 demonstrates its multifaceted applications across a spectrum of industries and domains:

  • Smart Home Automation: Leveraging the ESP32-S3 facilitates the creation of seamless and user-friendly interfaces to oversee a plethora of smart home functionalities. Users can effortlessly manage an array of operations encompassing lighting controls, temperature adjustments, surveillance systems, and an array of connected devices through a singular, intuitive interface.
  • Industrial Control Systems: The formidable processing capabilities and GPIO versatility of the ESP32-S3 render it an optimal choice for orchestrating Industrial Human-Machine Interfaces (HMIs). Its adeptness enables the monitoring, control, and automation of machinery and intricate processes within manufacturing and production landscapes, augmenting efficiency and precision.
  • Healthcare and Wearable Devices: Its efficiency in power consumption and wireless connectivity features positions the ESP32-S3 as an advantageous component in the realm of healthcare HMIs. This microcontroller serves as a foundational element in crafting solutions such as remote patient monitoring systems and innovative wearable health devices, catalyzing advancements in healthcare services.
  • IoT and Consumer Electronics: The ESP32-S3’s prowess in wireless communication renders it an indispensable component within the Internet of Things (IoT) ecosystem and consumer electronics. Its capabilities enable the development of interactive interfaces tailored for smart devices, wearables, and the central hubs orchestrating the interconnectedness within the burgeoning IoT landscape.


NORVI ESP32-S3 in Building HMI

The NORVI HMI, featuring the SP32-S3 Module from Espressif, represents a robust and versatile solution tailored for Human-Machine Interface (HMI) applications. This comprehensive system amalgamates advanced technology components, including a powerful processor with inherent communication capabilities, a 5-inch LCD with a Resistive Touch Panel for optimal user interaction, and RS-485 communication support ideal for MODBUS interactions with a HOST Processor. Moreover, the HMI incorporates Isolated Digital Inputs for seamless sensor or switch integration, Analog Inputs supporting 0 – 10V and 4-20mA ranges with a 16-bit ADC for precise signal handling, and Transistor Outputs capable of driving 24V relays and generating PWM outputs. This rich feature set positions the NORVI HMI as a versatile, reliable, and adaptable platform suitable for a broad spectrum of industrial and automation scenarios, facilitating efficient data exchange, device control, and user interaction within various environments.


Buy Now: https://norvi.lk/esp32-based-hmi/ 

Or, Inquiry us at [email protected]


Conclusion

The ESP32-S3 microcontroller, renowned for its robustness and adaptability, emerges as an optimal and multifaceted solution for fabricating Human-Machine Interfaces (HMIs). Its intrinsic fusion of formidable processing capabilities, an extensive array of connectivity options, adaptable hardware interfacing capabilities, and fortified security features underscores its suitability. This versatile microcontroller’s applications transcend across multifarious industries, holding the promise of orchestrating seamless interactions between users and machines while fostering a culture of innovation within the realm of Human-Machine Interfaces. Harnessing the inherent advantages of the ESP32-S3, developers are empowered to craft intricate, highly responsive, and feature-laden HMIs meticulously tailored to cater to a wide spectrum of user needs and preferences.

Posted on Leave a comment

Building a Low-cost HMI with ESP32-S3 Chip & LVGL for Innovative Projects

Building a Low-cost HMI with ESP32-S3 Chip & LVGL for Innovative Projects

Low-cost HMI can be used for your innovative projects. Wondering how to choose and what are their features. Learn through this article.

The world of embedded systems has been witnessing a revolutionary transformation, marked by innovations that redefine the boundaries of technology. At the forefront of this evolution stands the NORVI ESP32 HMI, an ingenious fusion of the ESP32-S3 microcontroller, a versatile 5-inch TFT LCD, and the dynamic LVGL Graphics Library. This confluence presents an alluring solution for developers and enthusiasts seeking to create cost-effective yet high-performance Human-Machine Interfaces (HMIs).

Key 3 Features of Low-cost HMI

A Low-cost HMI (Human-Machine Interface) solution boasts three fundamental components.

Firstly, it integrates the ESP32-S3 Microcontroller, esteemed for its robust capabilities in handling IoT applications, equipped with Wi-Fi, Bluetooth, and a rich set of peripherals. Secondly,  it incorporates an 8-bit RGB 5-inch LCD complemented by a touch panel, offering a cost-effective yet visually engaging display solution, ideal for various interactive applications. Lastly, leverages the LVGL (LittlevGL) Graphics Library, renowned for its efficiency in creating intuitive user interfaces across diverse embedded systems. This amalgamation delivers an affordable yet powerful HMI platform suitable for numerous projects requiring graphical user interfaces and touch interaction. These Low-cost HMI features will be discussed one by one now.

Unveiling the ESP32-S3 Microcontroller

  • As the first feature of Low-cost HMI,  ESP32-S3 microcontroller can be identified.
  • The NORVI ESP32 HMI is based on the ESP32-S3 microcontroller, which has 45 physical GPIO pins. It utilizes 20 GPIO pins for the display and the majority of the remaining pins for various functions, including digital inputs, transistor outputs, and communication.
  • ESP32-S3 is best for low-power applications that require advanced Wi-Fi and Bluetooth capabilities.
  • ESP32-S3 is a newer and more advanced microcontroller, and as such, it is generally more expensive than ESP32. But ESP32-S3 is an enhanced variant of the ESP32 microchip. Compared with ESP32, ESP32-S3 supports larger, high-speed octal SPI flash, and PSRAM with configurable data and instruction cache. Prices for ESP32-S3 can range from around $5 to $15 per unit, depending on the specific model and features.
  • However, the NORVI ESP32 HMI has an integrated ESP32-S3 module, serving both UI functions and communication purposes. This integrated approach lends the NORVI ESP32 HMI a cost-effective and higher performance edge compared to the others.

8-bit RGB 5-inch LCD with touch panel: A Visual Delight

  • Second Low-cost HMI feature is LVGL 5inch LCD Display with 8-bit RG and resistive touch.
  • NORVI ESP32 HMI offers a crystal-clear 5-inch TFT LCD with resistive touch technology, ensuring a user-friendly and interactive experience.
  • TFT display has a resolution of 800×480 pixels and a high contrast ratio of 500:1, making it capable of rendering deep blacks and vibrant colors.  It also has a high brightness of 450cd/m2, making it suitable for use in both indoor and outdoor environments.
  • TFT display comes with optional resistive touch screen capability, allowing users to interact with the display through touch. This option allows for precise touch input using a stylus or finger.
  • 8-bit RGB is used to interface with large color displays. It sends 8 bits of data for each of the three colors, Red Green, and Blue every clock cycle. Since there are 24 bits of data transmitted every clock cycle, at clock rates up to 50 MHz, this interface can drive much larger displays at video frame rates of 60 Hz and up.RGB is Low-cost due to technology maturity but High performance.
  • Prices for a 5-inch TFT LCD can range from around $19 to $20 per unit, depending on the specific model and features.

Powering Creativity with LVGL Graphics Library

  • Third, the Low-cost HMI feature is LVGL library support which makes it more useful.
  • LVGL is the most popular free and open-source embedded graphics library that offers a wide range of features that can be used to create beautiful UIs for any display type. LVGL’s graphical elements are fully customizable.
  • It provides building blocks for creating user interfaces on embedded systems and it has advanced graphics features such as animation, also it supports a variety of input devices, including touch pads, mice, keyboards, and encoders. 
  • Especially, the library is hardware-independent, meaning it can be used with any microcontroller or display. 

Embracing the Future of Human-Machine Interaction

The ever-expanding landscape of embedded systems, the NORVI ESP32 HMI stands as a testament to the innovation driving the industry forward as positioning by Low-cost HMI. In the realm of creating low-cost Human-Machine Interfaces (HMIs), the fusion of the ESP32-S3 microcontroller with NORVI ESP32 HMI, alongside the integration of a versatile 5-inch TFT LCD and the dynamic LVGL Graphics Library, defines an enticing solution for developers and enthusiasts.Whether an experienced developer or a hobbyist embarking on a new project, this powerful combination offers the tools needed to bring ideas to life. In a world where seamless interaction between humans and machines is paramount, the NORVI ESP32 HMI and its companions pave the way for a new era of user-friendly and cost-effective solutions.                                     

Low-cost HMI is now available to buy from NORVI.

Visit the Product Page or, Contact Us at [email protected]

Stay Connected to get updated news on LVGL for HMI: Facebook : LinkedIn : Twitter: YouTube

Posted on Leave a comment

Why NORVI ESP32-based HMI for your innovative project or a system?

NORVI ESP32-based HMI

Do you know NORVI has a new addition? Here is why you should choose it. NORVI ESP32-based HMI solution is now available to buy, explore more now. 

Introducing the groundbreaking NORVI ESP32-based HMI (Human Machine Interface), a marvel in the realm of Programmable HMI supported with LVGL (Light and Versatile Graphics Library). This innovative system redefines interaction dynamics by bestowing users with an immersive graphical environment, seamlessly melding technology and user experience. Crafted to be programmed with Arduino, this HMI stands as a pinnacle of versatility, providing an influential platform for the inception of intuitive user interfaces while harnessing the potent capabilities of ESP32 microcontrollers.

The fusion of NORVI’s prowess with LVGL technology is a game-changer, empowering creators to sculpt visually captivating, responsive, and feature-rich interfaces. This amalgamation of cutting-edge features positions it as the go-to solution across diverse applications clamoring for user-friendly interactions. From IoT devices to automation systems and beyond, the NORVI ESP32-based HMI emerges as the quintessential choice for those seeking an unprecedented blend of innovation, functionality, and aesthetics in their projects.

See the diagram and explanations below for how an ESP32-based HMI is developed, as well as its benefits and features

ESP32-based HMI - Product Overview

Key Advantages of NORVI ESP32- based HMI

The NORVI ESP32-based HMI boasts several key advantages that set it apart as a game-changer in the realm of Human Machine Interfaces:

  • ESP32-S3-WROOM32 Module: At its core lies the powerful ESP32-WROOM32 module, renowned for its robust performance and versatility. This module serves as the foundation, providing the HMI with a potent processing engine, ample memory, and efficient wireless connectivity capabilities. This is from Espressif Systems and it has the following advantages.
  • High-performance processing capabilities
  • Dual-core microcontroller architecture
  • Ample built-in memory and storage options
  • Integrated Wi-Fi and Bluetooth connectivity
  • Low power consumption and energy-efficient operation
  • Support for various interfaces such as SPI, I2C, UART, and more
  • Rich set of peripherals and features for versatile applications
  • LVGL Support Display: The integration of LVGL (Light and Versatile Graphics Library) support elevates the user interface experience to new heights. This advanced feature empowers creators to design visually stunning, responsive, and feature-rich graphical interfaces, enhancing user interaction and engagement and many advantages as below.
  • Enables creation of visually appealing and rich graphical user interfaces (GUIs)
  • Offers responsive and smooth interaction for users
  • Provides a wide range of customizable widgets and graphics
  • Supports animations and transitions for enhanced user experience
  • Compatibility with various display sizes and resolutions
  • Optimized for resource-efficient performance on embedded systems
  • PLC Functionality with Arduino: The HMI’s compatibility and integration with Arduino enable it to function as a Programmable Logic Controller (PLC). This extends its utility beyond a mere display interface, allowing it to control and manage various processes and systems, making it an all-encompassing solution for automation and control applications its key advantages are as below.
  • Versatile control and management capabilities for various processes and systems.
  • Integration of human-machine interaction with control logic, enhancing usability.
  • Flexibility in programming and customization for specific automation needs.
  • Expanded functionalities beyond traditional HMI interfaces.
  • Seamless communication between the user interface and control systems.
  • Utilizes widely supported Arduino ecosystem for easy development and scalability.

Features-based Applications

By leveraging the ESP32-WROOM32 module, harnessing LVGL’s display capabilities, and incorporating PLC functionality through Arduino compatibility, the NORVI ESP32-based HMI emerges as a comprehensive, adaptable, and high-performance solution for a wide spectrum of applications, promising unparalleled versatility and functionality. Also, it introduces a robust 5-inch LCD Display with Resistive Touch, boasting a suite of features tailored for diverse industrial applications:

  • 5-inch LCD Display with Resistive Touch: Offers a crisp and clear display, enhancing user interaction and visual clarity in various industrial environments.
  • Built-in Buzzer: Equipped with a built-in buzzer for audio alerts or notifications, facilitating immediate and audible feedback for critical processes or events.
  • Digital Inputs: Provides digital input ports for seamless integration and connectivity with external devices or sensors, enabling versatile data acquisition and control.
  • Analog Inputs: Includes analog input capabilities, allowing precise measurement and monitoring of varying voltage levels or sensor outputs, crucial for nuanced control and analysis.
  • Transistor Outputs: Features transistor outputs that facilitate control over external devices or systems, offering flexibility and adaptability in managing industrial processes.
  • Supports Industrial Voltage up to 24V DC: Designed to handle industrial-grade voltages up to 24V DC, ensuring compatibility with standard industrial power systems and environments.

Visit our product page for more information: NORVI HMI

Industrial Applications

The ESP32-based HMI with LVGL support and Arduino functionality excels in these industrial applications by providing a powerful platform for creating intuitive and feature-rich user interfaces while leveraging the capabilities of ESP32 microcontrollers. Its versatility, robustness, and ease of integration make it a valuable asset across various industrial settings as below.

  • Manufacturing Automation: Employed in manufacturing processes for control interfaces, monitoring production lines, and managing machinery with intuitive and responsive user interfaces.
  • Building Automation: Used in building management systems to control lighting, HVAC systems, security features, and access controls with user-friendly interfaces.
  • Industrial IoT (IIoT) Solutions: Integrated into IIoT systems for data visualization, remote monitoring, and controlling industrial equipment and machinery.
  • Process Control and Instrumentation: Utilized in industries such as chemical, pharmaceuticals, and food processing for real-time monitoring, controlling parameters, and managing processes.
  • Energy Management: Applied in energy production facilities, smart grids, and renewable energy systems for monitoring and controlling power generation, distribution, and consumption.
  • Smart Agriculture: Used in precision agriculture for monitoring environmental conditions, controlling irrigation systems, and managing farm machinery.
  • Transportation and Logistics: Employed in smart warehouses and logistics systems for inventory management, tracking goods, and controlling conveyor systems.
  • Water Management: Utilized water treatment plants and distribution systems for monitoring water quality, managing pumps and valves, and automating processes.
  • Healthcare Equipment: Integrated into medical devices and healthcare equipment for user interfaces, patient monitoring, and controlling automated systems.
  • Robotics and Automation: Applied in robotics for creating interactive control panels, monitoring robotic systems, and managing automation processes.

NORVI ESP32-based HMI Models

There are two models available in ESP32-based HMI now to buy!

ESP-HMI-5C-CI

ESP-HMI-5C-VI

  • ESP32-WROOM32 Module
  • Built-in 5Inch LCD Display with Resistive Touch
  • Built-in Buzzer
  • Built-in microSD Card support
  • LVGL Supported Display
  • DS3231 RTC with battery backup
  • PLC functionality with Arduino

Inputs and Outputs

  • 4 x Digital Inputs 24V
  • 4 x 4 – 20mA Analog Inputs
  • 4 x Transistor Outputs

Communication

  • 2.4Ghz WiFi + Bluetooth
  • W5500 Ethernet
  • RS-485


  • ESP32-WROOM32 Module
  • Built-in 5Inch LCD Display with Resistive Touch
  • Built-in Buzzer
  • Built-in microSD Card support
  • LVGL Supported Display
  • DS3231 RTC with battery backup
  • PLC functionality with Arduino

Inputs and Outputs

  • 4 x Digital Inputs 24V
  • 4 x 0 – 10A Analog Inputs
  • 4 x Transistor Outputs

Communication

  • 2.4Ghz WiFi + Bluetooth
  • W5500 Ethernet
  • RS-485


Additionally, if there are any specific technical specifications, compatibility details, or customization options available for this ESP32-based HMI, make an inquiry to us at [email protected]

Begin your journey into exploring the endless possibilities that the NORVI ESP32-based HMI offers for your project or innovative system. Your adventure starts with us today. Purchase Now! 

#NORVI #ESP32 #LVGL #HMI #HumanMachineInterface #Arduino #IndustrialAutomation #IoT #PLC #UserInterface #ESP32WROOM32 #IndustrialControl #LVGLSupport #InnovationInTech #AutomationSolutions #EmbeddedSystems #TechnologyIntegration #SmartTech #IndustrialApplications #HMIsolutions #LVGLdisplay #arduino #ArduinoHMI #IndustrialHMI #HMItechnology #UserFriendlyInterface #IoTApplications #AutomationControl #SmartHMI #TouchScreenDisplay #esp #esp32 #esp32project #esp32wroom #Technology #IntuitiveUserInterfaces #Industries #hmisolutions #hmiprojects #HMIDesign #EmbeddedSystems #UserInterface #HMIProgramming #TouchscreenTech #SmartDevices #Electronics #DIYElectronics #Arduino #TechInnovation #WirelessCommunication #InternetOfThings #MakerCommunity #Engineering #Innovation #HMIControl #OpenSourceHardware #microcontrollers#HMIApplications #EmbeddedHMI #ControlSystems #DigitalInterface #InnovativeHMI #ESP32Technology #LVGLSupport #HumanMachineInteraction #HMIdevelopment #BuyESP32HMI #BuyNow


Posted on Leave a comment

Embracing LVGL for HMI : Unlocking Seamless Excellence in Automation

LVGL for HMI

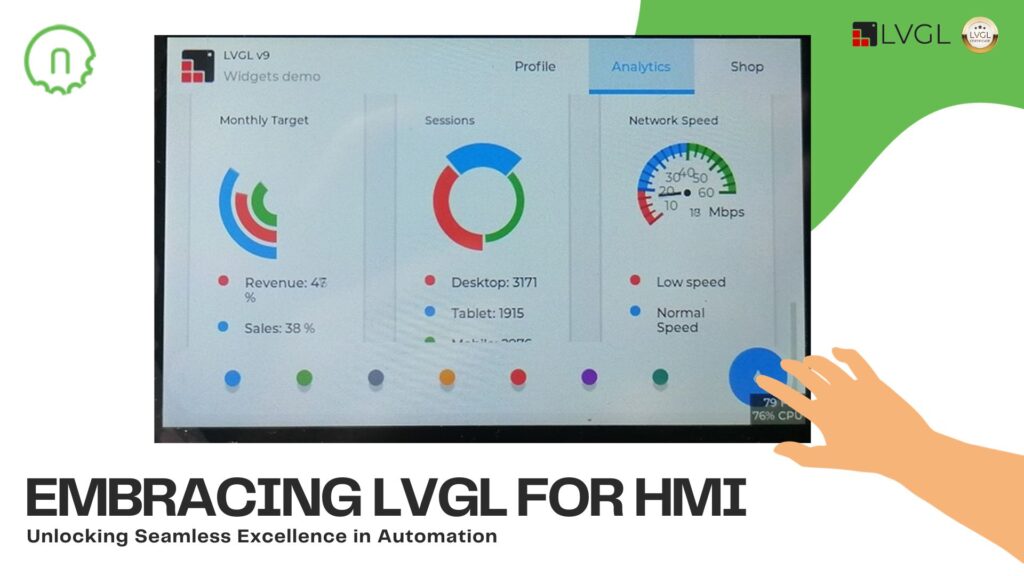
Discover the significance of LVGL for HMI in driving automation initiatives across industries. Explore why LVGL stands out as the ideal choice for crafting efficient, user-friendly interfaces. Dive into the world of LVGL HMI for a seamless automation journey.

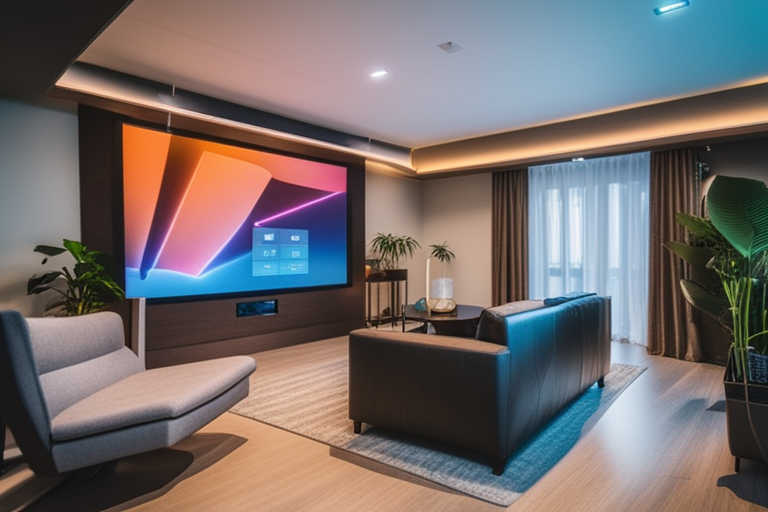
In the modern landscape of automation, the role of Human-Machine Interfaces (HMI) is becoming increasingly crucial. As industries seek more sophisticated and user-friendly interfaces to control and monitor automated systems, the choice of the right graphics library becomes imperative. LVGL (Light and Versatile Graphics Library) stands out as an efficient and adaptable solution for crafting robust HMIs that drive the automation journey across diverse industries.

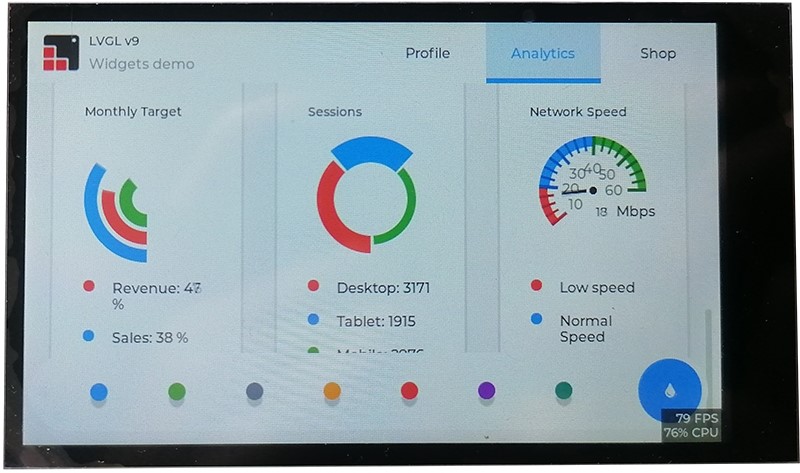
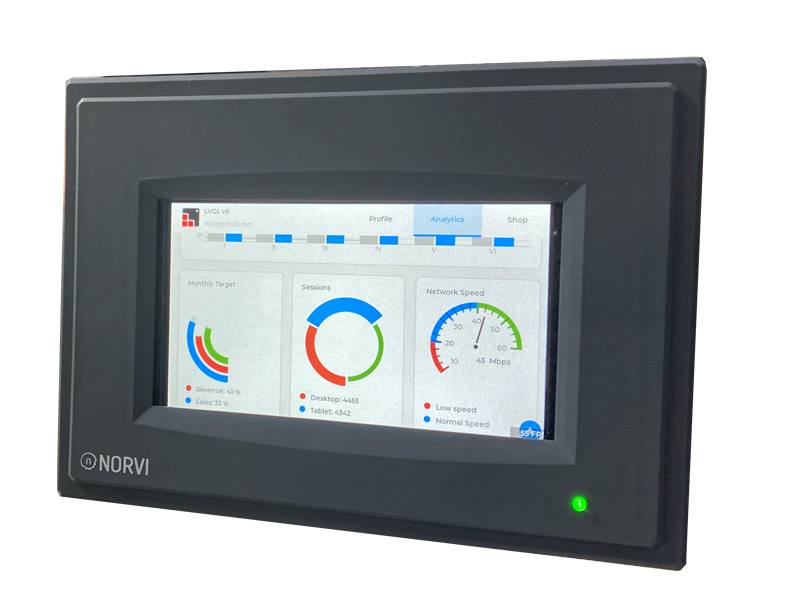
LVGL, an open-source graphics library, has gained widespread recognition for its versatility and scalability in developing user interfaces for a multitude of devices. Its lightweight nature and flexibility make it an ideal choice for creating visually appealing, responsive, and intuitive interfaces, ranging from small microcontrollers to advanced touchscreens.

LVGL for HMI: The Advantages for Automation

When looking to why LVGL for HMI, many advantages which comes with LVGL is essential to explore.

LVGL for HMI Display

1. Versatility and Flexibility

LVGL’s adaptability across various hardware platforms and operating systems allows developers to craft HMIs that seamlessly integrate into existing systems. This versatility ensures a smooth transition into automated processes across industries, facilitating efficient operations.

2. Performance and Efficiency

Efficiency is the cornerstone of automation, and LVGL excels in this aspect. Its optimized codebase ensures swift rendering and responsiveness, essential for real-time monitoring and control in automated systems. This high performance enhances user experiences and operational efficiency.

3. Customization and User Experience

LVGL offers a wide array of customizable features, including widgets, themes, and animations, enabling developers to tailor interfaces precisely to meet specific industry needs. This customization capability enhances user experiences and ensures that HMIs align perfectly with desired functionalities.

4. Active Open-Source Community

One of LVGL’s strengths lies in its robust open-source community. This active network of developers continually contributes to the library, providing regular updates, bug fixes, and new features. The community support ensures that users have access to the latest advancements and ongoing assistance in HMI development.

Embracing LVGL for Future Automation Initiatives

LVGL (Light and Versatile Graphics Library) serves as a unifying force across diverse industry domains, seamlessly spanning from industrial automation to smart home devices and automotive systems, providing a consistent and reliable HMI solution adaptable to diverse industry requirements. Its inherent flexibility and robust features provide a consistent and reliable Human-Machine Interface (HMI) solution adaptable to the unique requirements of various industries.

In the realm of industrial automation, LVGL’s capabilities shine brightly. Companies are able to receive the LVGL Certificate and get benefits to change the game too.

Its versatility allows for the creation of intuitive and visually appealing interfaces for industrial control systems. Whether it’s operating machinery, monitoring processes, or managing complex workflows, LVGL empowers developers to design HMIs that are both functional and user-friendly. Its ability to integrate with different hardware platforms ensures compatibility with a wide range of industrial devices, enhancing efficiency and productivity in manufacturing and automation processes.

Moving towards smart home devices, LVGL for HMI continues to demonstrate its adaptability. From smart thermostats to home security systems, LVGL enables the development of sleek and interactive user interfaces that seamlessly blend into the modern home environment. Its customizable widgets and graphical elements facilitate the creation of intuitive controls, allowing users to effortlessly manage and monitor various aspects of their smart homes.

In the automotive industry, LVGL plays a pivotal role in crafting advanced infotainment systems, instrument clusters, and navigation interfaces. Its ability to handle high-resolution graphics and animations ensures a visually compelling and responsive experience for drivers and passengers. LVGL’s adaptability to different screen sizes and hardware configurations makes it a reliable choice for automotive manufacturers seeking to deliver sophisticated yet user-friendly interfaces within vehicles.

The consistency and reliability of LVGL for HMI solution across these diverse industries lie in its capability to provide a unified development platform. Its cross-platform compatibility, extensive widget library, and community support enable developers to create tailored interfaces that meet the specific needs and standards of each industry, ensuring a seamless and reliable user experience across industrial automation, smart home devices, and automotive systems.

In essence, LVGL serves as a versatile bridge, offering a common ground for HMI development, and its adaptability makes it an invaluable asset in meeting the varied demands of industrial, residential, and automotive sectors, fostering innovation and efficiency across these domains. Further refer.

Conclusion

The adoption of LVGL for HMI signifies a strategic move towards enhancing automation initiatives. It not only ensures efficient and user-centric interfaces but also future-proofs systems by allowing seamless integration and adaptation to evolving technological landscapes.

In conclusion, LVGL stands as a beacon for businesses aiming to embark on an automation journey that prioritizes streamlined operations, enhanced user experiences, and optimized productivity across industries.

Unleash the potential of LVGL and unlock a new era of user experience mastery! Dive into the intricacies of LVGL’s versatility, reliability, and seamless integration, enabling a consistent and powerful HMI experience adaptable to diverse industry needs.

Are you ready to elevate your interface game? Embrace LVGL and embark on a journey towards crafting next-level Human-Machine Interfaces that set new standards in usability, aesthetics, and performance. Don’t miss out on harnessing the positive power of LVGL for your HMI aspirations!

ESP32-based HMI which supports LVGL is now available to buy from NORVI.

Visit the Product Page or, Contact Us at [email protected]

Stay Connected to get updated news on LVGL for HMI: Facebook : LinkedIn : Twitter

Wanna know more about HMI from NORVI? Read below,

The Rise of HMI Applications: Ultimate Tech Landscape

Thriving HMI Technology: Future of Human-Machine Interface

Optimizing HMI Projects for Industrial Automation Success

#LVGL #HMI #UserInterfaces #Automation #TechInnovation #GraphicDesign #InterfaceDesign #UserExperience #SmartTechnology #IndustrialAutomation #SmartHomes #AutomotiveSystems #InnovationInProgress #TechnologySolutions #FutureTech #VisualDesign #UXDesign #SoftwareDevelopment #EmbeddedSystems #OpenSource #EfficiencyBoost #DigitalTransformation #VersatileGraphics #TechAdvancements #NextGenInterfaces #EngineeringExcellence #DigitalInnovation #HMI #UserInterfaces #UXDesign #InterfaceDesign #Automation #IndustrialDesign #TechSolutions #UserExperience #SmartTech #TechnologyInnovation #DigitalInterfaces #UIUX #FutureTechnology #Innovation #DigitalTransformation #Engineering #SmartDevices #Efficiency #UserCentricDesign #TechAdvancement #Digitalization #HumanCenteredDesign #InnovativeTech #AdvancedInterfaces #IntuitiveDesign #UserInteraction #InterfaceSolutions

Posted on Leave a comment

Why ESP32-based HMI for Your Innovative IoT and Smart Applications

Why ESP32-based HMI for Your Innovative IoT and Smart Applications

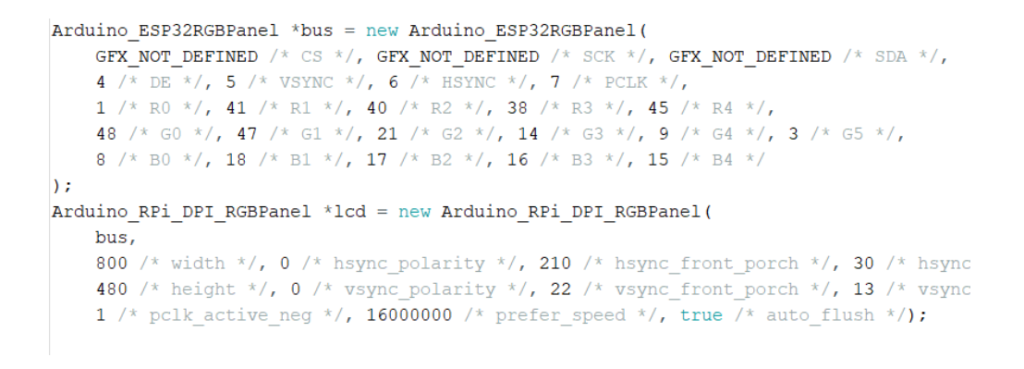
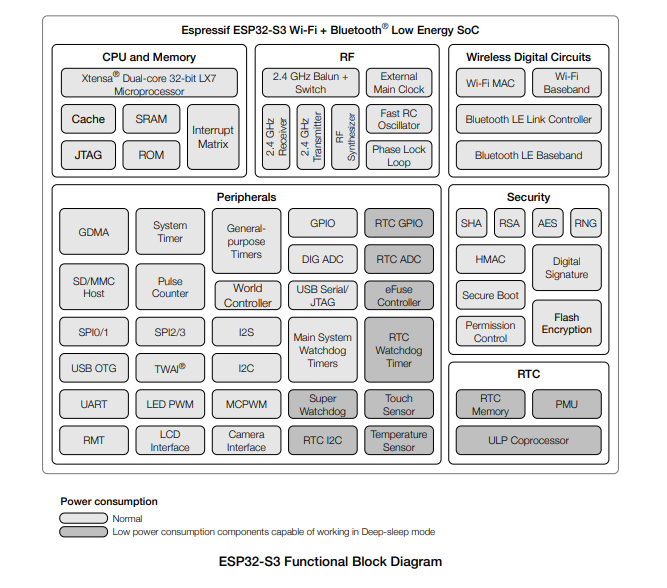
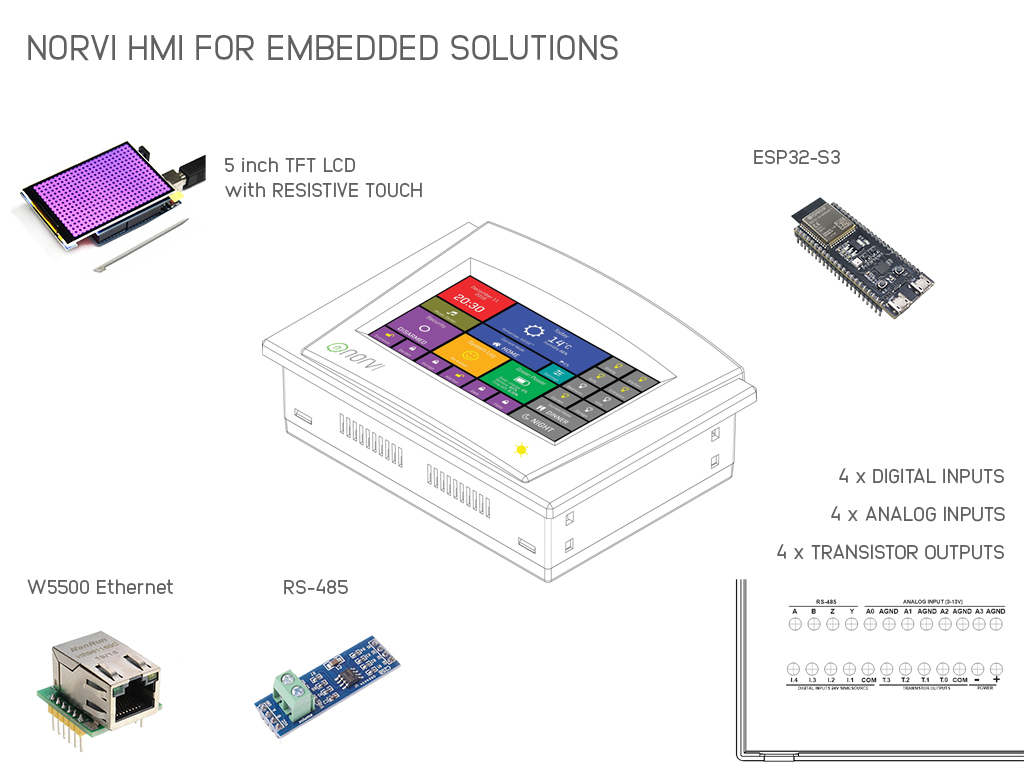
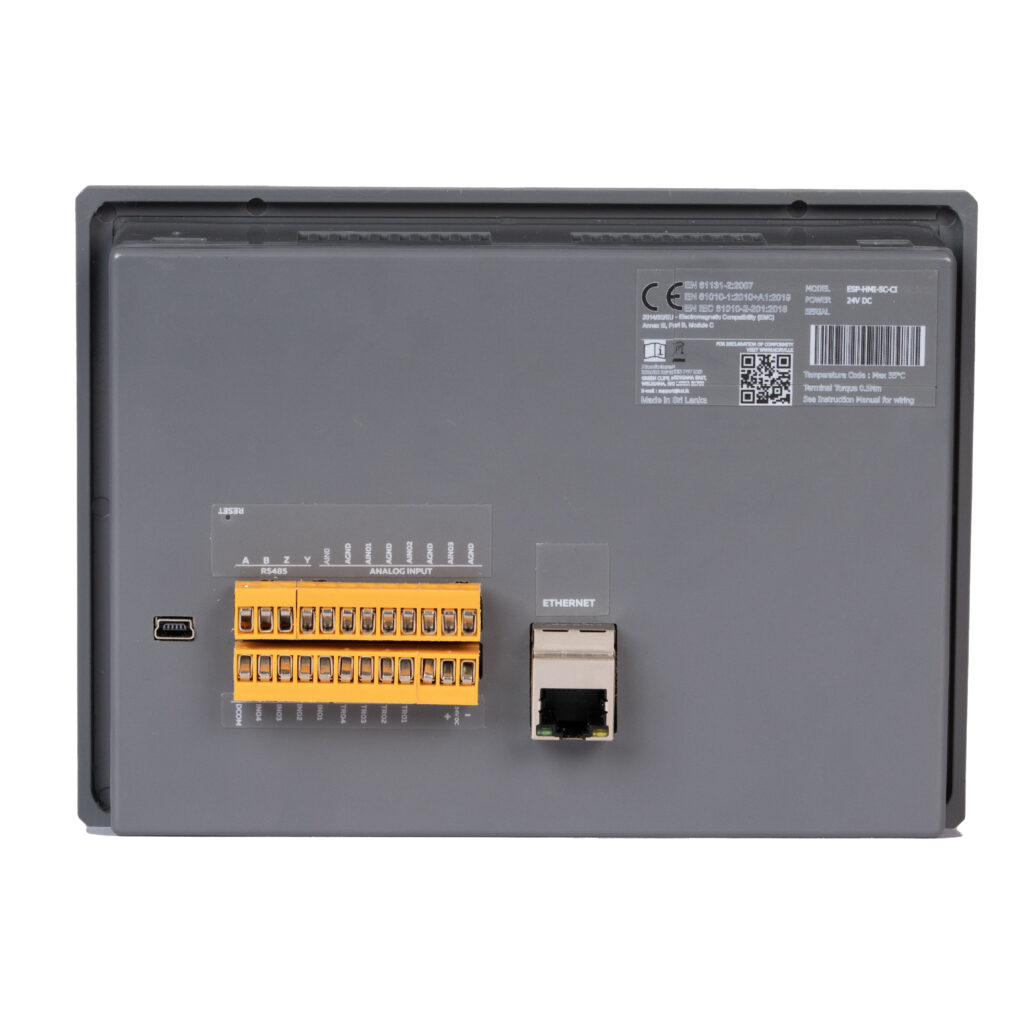
The ESP32, a powerful microcontroller with integrated Wi-Fi and Bluetooth capabilities, is increasingly gaining prominence as an ideal choice for Human-Machine Interface (HMI) systems in IoT and smart applications. Its relevance stems from its dual-core processor, low power consumption, rich set of peripherals, and ample processing power, making it well-suited for HMI applications. This article explores the key features, integration, advantages, and applications of ESP32 in HMI systems, along with potential challenges and future trends in ESP32-based HMI technology.

ESP32 microcontroller board

What is ESP32 and its relevance to Human-Machine Interface (HMI)?

The ESP32, known for its integrated Wi-Fi and Bluetooth capabilities, is a robust microcontroller that is well-suited for IoT and smart applications. Its dual-core processor and ample resources enable it to handle complex tasks, making it a preferred choice for HMI systems, acting as the bridge between the user and the machine in various applications.

Key features of ESP32 for HMI applications

The ESP32’s key features, including its dual-core architecture, low power consumption, rich set of peripherals, and ample processing power, make it an excellent choice for HMI applications. Its integrated Wi-Fi and Bluetooth capabilities allow for wireless communication, while its robust processing capabilities enable the implementation of responsive and feature-rich user interfaces.

Smart home automation system controlled by ESP32-based HMI

Applications of ESP32 in HMI systems

The versatility and reliability of the ESP32 make it a preferred choice for enabling intuitive and interactive user experiences in various HMI applications across domains such as home automation, industrial control, and smart environments.

Understanding HMI

Definition and significance of HMI in technology and industrial automation

HMI, or Human-Machine Interface, plays a crucial role in enabling users to monitor, control, and interact with various devices and systems in technology and industrial automation, encompassing the hardware and software components that facilitate intuitive and efficient communication between humans and machines.

Importance of ESP32 in enhancing the functionality of HMI systems

The integration of ESP32 in HMI systems enhances functionality by providing a robust platform for developing interactive and user-friendly interfaces, empowering developers to create compelling HMI solutions that offer seamless control and monitoring capabilities.

Integration of ESP32 with HMI

Process and considerations for integrating ESP32 with HMI systems

Integrating ESP32 with HMI systems involves identifying specific application requirements, selecting suitable display and input devices, and leveraging the ESP32’s capabilities to enable seamless communication and interaction, considering aspects such as data exchange protocols, user input methods, and real-time responsiveness.

Advantages and unique capabilities of ESP32 for HMI solutions

The ESP32 offers distinct advantages for HMI solutions, including its support for various communication protocols, rich peripheral integration, and the ability to handle complex tasks without compromising performance, making it suitable for developing feature-rich and visually appealing HMI systems.

User interface design mockup for an ESP32-based HMI

Designing an ESP32-Based HMI

Hardware components and requirements for designing an HMI using ESP32

Designing an HMI using ESP32 requires the selection of appropriate display modules, input devices, and peripheral components to complement the microcontroller’s capabilities, including touchscreen displays, physical buttons, and sensors for versatile user interaction.

Programming techniques for ESP32 in HMI applications

Programming the ESP32 for HMI applications involves utilizing platforms such as Arduino IDE or ESP-IDF to develop interactive user interfaces, implement communication protocols, and integrate sensor data for real-time feedback, leveraging the ESP32’s dual-core architecture for efficient multitasking and responsive user experiences.

User interface design considerations for ESP32-based HMI systems

Effective user interface design for ESP32-based HMI systems involves creating intuitive layouts, employing visual feedback for user actions, and optimizing the use of graphical elements to enhance usability, considering factors such as color schemes, font sizes, and interactive elements.

Applications of ESP32-Based HMI

Home automation and smart device control

ESP32-based HMI systems find extensive applications in home automation, enabling users to remotely control lighting, HVAC systems, security cameras, and other smart devices, enhancing user convenience and enabling seamless integration of diverse smart home components.

Industrial control, monitoring, and automation

In industrial settings, ESP32-based HMI solutions empower operators to monitor and control complex machinery, temperature and humidity sensors, and other critical parameters, contributing to enhanced operational efficiency and safety.

IoT devices and integration in smart environments

The ESP32’s compatibility with IoT devices and its ability to connect to cloud services make it an ideal choice for integrating IoT devices in smart environments, enabling seamless integration and control of diverse IoT devices.

Real-life examples of successful ESP32-based HMI implementations

Real-life examples of successful ESP32-based HMI implementations include smart home control panels, industrial monitoring and control systems, and IoT-enabled environmental monitoring solutions, showcasing the versatility and reliability of ESP32 in diverse applications.

A women  wanted to upgrade her home with smart devices for convenience and energy efficiency. She decided to implement an ESP32-based HMI system to control and monitor various aspects of her home, such as lighting, temperature, and security.

Streamlined Control and Monitoring

With the ESP32-based HMI, it was able to create a user-friendly interface to seamlessly control her smart devices from a single dashboard. Whether she was at home or away, she could easily adjust the thermostat, turn lights on and off, and receive security alerts, providing her with peace of mind and saving energy when rooms were unoccupied.

Seamless Integration and Customization

It also appreciated the ease of integrating new IoT devices into her smart home system. The ESP32’s flexibility and compatibility allowed her to customize the interface according to her preferences, creating a personalized and intuitive control center for her home automation.

The ESP32-based HMI not only enhanced the functionality of smart home but also showcased the adaptability and practicality of ESP32 in real-life applications, demonstrating its effectiveness in home automation and smart device control.

Effectiveness and adaptability of ESP32-based HMI in diverse scenarios and industries

The effectiveness and adaptability of ESP32-based HMI in diverse scenarios and industries underscore its ability to cater to varying requirements, from consumer-facing smart devices to industrial automation and monitoring applications, showcasing its flexibility and robust feature set.

Advantages and Challenges

Advantages and benefits of utilizing ESP32 for HMI solutions

Utilizing ESP32 for HMI solutions offers advantages such as wireless connectivity, robust processing power, and support for rich graphical interfaces, contributing to its appeal for diverse HMI applications.

Addressing potential challenges and limitations in ESP32-based HMI implementation

Challenges in ESP32-based HMI implementation may include optimizing power consumption for battery-operated devices, ensuring secure communication, and addressing compatibility issues with external components, requiring careful consideration for successful implementation.

Conceptual illustration of potential future advancements in ESP32-based HMI technology

Future Trends

Advancements and emerging trends in ESP32-based HMI technology

Future advancements in ESP32-based HMI technology may encompass enhanced integration with AI and machine learning algorithms, optimization for low-power applications, and expanded support for advanced graphical interfaces and touch technologies.

Potential innovations and improvements on the horizon for ESP32 in HMI systems

Innovations on the horizon for ESP32 in HMI systems may include enhanced security features, expanded wireless connectivity options, and advancements in real-time data processing capabilities, paving the way for more sophisticated and responsive HMI solutions.

Best Practices and Tips

Effective implementation strategies for ESP32-based HMI solutions

Effective implementation of ESP32-based HMI solutions involves thorough planning, consideration of power management strategies, and adherence to best practices in user interface design and communication protocols, along with rigorous testing and optimization.

Ensuring optimal performance, security, and user experience in ESP32-based HMI applications

To ensure optimal performance, security, and user experience in ESP32-based HMI applications, developers should prioritize efficient code optimization, implement secure communication protocols, and focus on creating intuitive and responsive user interfaces catering to specific user needs.

Conclusion

The ESP32’s integration in HMI systems offers a compelling combination of robust processing power, wireless connectivity, and support for feature-rich user interfaces, demonstrating its versatility and relevance in diverse domains such as home automation, industrial control, and IoT integration.

The evolution of ESP32-based HMI systems is poised to witness advancements in AI integration, enhanced security features, and expanded support for sophisticated user interfaces, paving the way for more immersive and intelligent human-machine interactions in IoT and smart applications.

In conclusion, the ESP32’s capabilities position it as a key enabler for the next generation of HMI solutions, offering a potent combination of performance, versatility, and reliability for diverse applications in IoT and smart technologies.

For more detailed examples and technical information, let’s explore specific case studies and in-depth technical insights into the challenges and optimization techniques encountered in ESP32-based HMI implementations. 

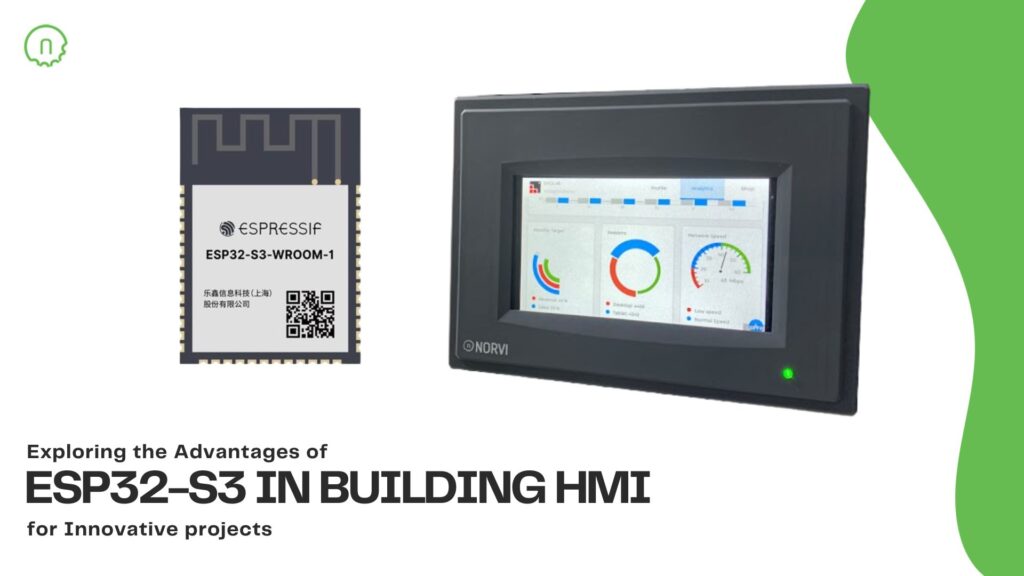
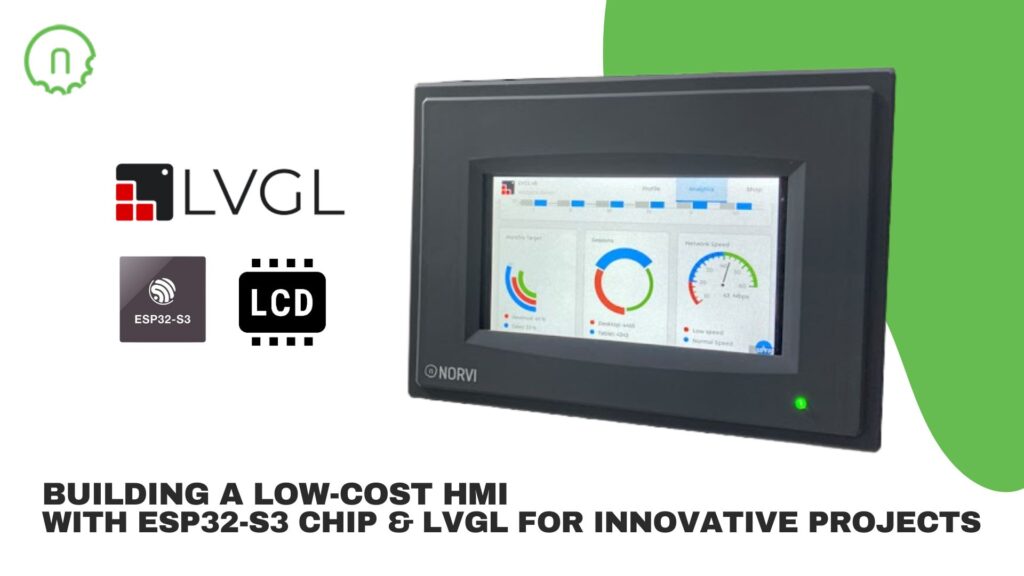
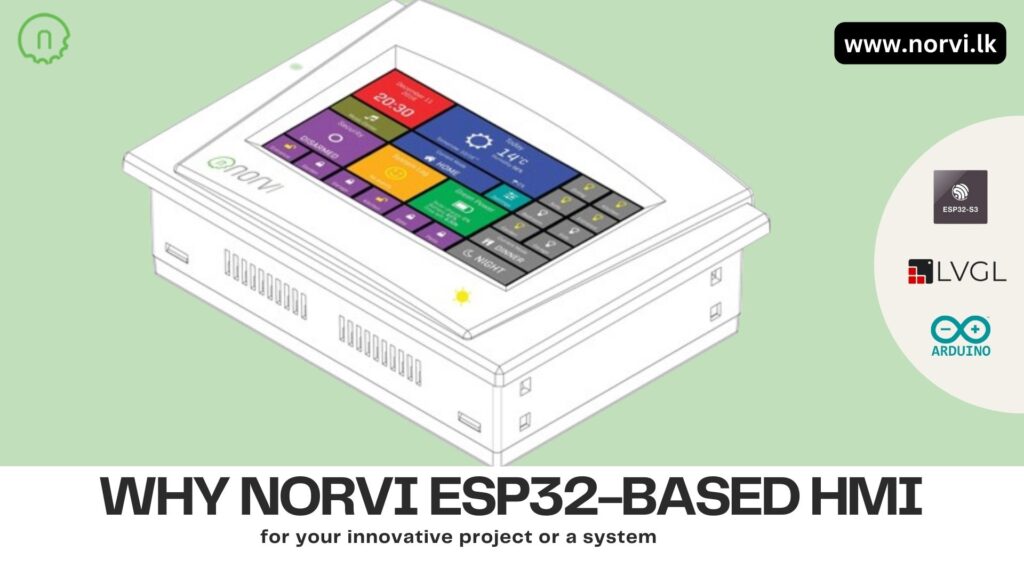
NORVI is about to launch its newly produced, ESP32-based HMI. Wait with us! 

Wanna know more about HMI from NORVI? Read below,

The Rise of HMI Applications: Ultimate Tech Landscape

Thriving HMI Technology: Future of Human-Machine Interface

Optimizing HMI Projects for Industrial Automation Success

#Norvi #esp #esp32 #esp32project #esp32wroom #HMI #HumanMachineInterface #Technology #IntuitiveUserInterfaces #Industries #hmisolutions #hmiprojects #HMIDesign #IoT #EmbeddedSystems #UserInterface #HMIProgramming #TouchscreenTech #SmartDevices #Electronics #DIYElectronics #Arduino #TechInnovation #WirelessCommunication #InternetOfThings #MakerCommunity #Engineering #Innovation #HMIControl #OpenSourceHardware #Microcontrollers